Synchronizing Broadcast Graphics with a MediaCentral | UX Sequence
Starting with MediaCentral UX v2.10, graphics added to an iNEWS story are shown in an associated MediaCentral UX script sequence. The Avid Maestro UX plug-in v2.3 and later supports this feature. For example, if you add a Maestro graphic to a story in MediaCentral UX, the graphic is automatically added to the associated sequence. If you change the timing of a graphic in the sequence, or delete a graphic, the change is also made in the story.
This topic describes how to use Maestro graphics in this workflow.
Requirements
To enable synchronized graphics, the MediaCentral server must be configured for the following:
• Avid iNEWS
• Avid Maestro with graphics connector
• Interplay Production
Only advanced Interplay Production sequences are supported for synchronized graphics. Graphics are not displayed in basic sequences that have been associated with a story.

For MediaCentral UX v2.10, an administrator needs to edit the application.properties file and the avid-common params file to enable this feature. For MediaCentral UX v2.10.1 and later, an administrator only needs to edit the avid-common-params file. For more information, see the
Avid MediaCentral Platform Services Installation and Configuration Guide.
Workflow
There are two types of broadcast graphics you can work with:
• Untimed graphic: No specific In point or Out point is set. During broadcast an operator needs to play the graphic manually
• Timed graphic: An In point is set; an Out point is optional. During broadcast, playback is automatic, based on the In point and Out point as they are set within a timing block in the sequence.
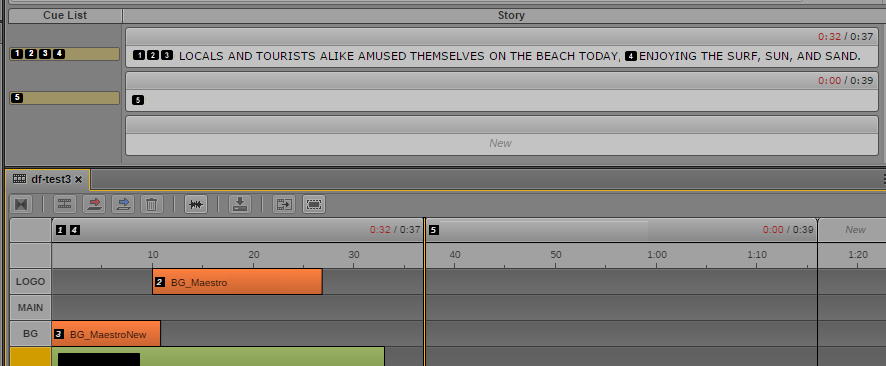
Both types of graphics are shown as production cues in a story. In a sequence, untimed graphics are shown as production cues, and timed graphics are shown as editable segments, each on a separate track. The following illustration shows graphics as production cues in a story (top) and the same graphics as production cues and graphics tracks in a sequence (bottom).
Graphics 1, 4, and 5 are untimed and are displayed in the timing block header. Graphics 2 and 3 are timed and are displayed as graphics tracks in the sequence. The track labels (LOGO, MAIN, and BG) are taken from the VSlot labels in the Maestro graphic.
Maestro graphics are supported only in sequences that are stored in a database in your local zone.
The following is a typical workflow:
1. An MC UX user opens a Maestro template in the Maestro Browser pane (as supported in MediaCentral UX v2.7.1 and later). This graphic can be timed (with In point and Out point) or untimed. The user edits the template as required to create a graphic for the story.
2. The user drags the graphic from the Maestro Browser pane to the iNEWS story (as supported in MediaCentral UX v2.7.1 and later).
3. When the user creates an associated script sequence (or opens a previously created one), placeholders for the graphics are automatically shown in the Sequence pane timeline.
4. The user can edit the In and Out points of a timed graphic shown in the graphics track, and delete timed graphics and untimed graphics. When the user saves the story, the changes are saved to the graphic in the story.
5. The user can preview the sequence and graphics in the Media viewer. A setting determines whether the preview uses rendered graphics or a representative frame.
6. The user can perform a send-to-playback. Graphics will be delivered separately.
Related Topics