Using File Attachments During Process Creation
When you create a process in the Assets pane, Search pane, Media pane, or File Info pane, you attach at least one asset to it. When you create a process in the Tasks pane, the process has no attachment. In each pane, if a process is configured accordingly in Interplay MAM, you can upload files to the process during process creation. In the process dialog box an Upload button is shown and dropping files to the process dialog box is enabled. See
Assets and Files as Attachments.
When you use file attachments for a process, you can finish process creation only if the following conditions are met:
• All file attachments are completely uploaded.
If a requirement is not fulfilled, the process dialog box’s OK button is disabled.
To upload files to a process:
1. Create a process to open a process dialog box.
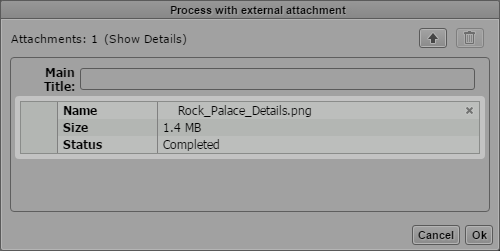
The following illustrations show a sample process that allows uploading one file.
2. Do one of the following:

Click the Upload button in the process dialog box and select the files to be uploaded in the Open dialog box.
Open the Explorer (Windows) or Finder (Mac), select one or several files and drag them to the process dialog box.
The drop zone is outlined in orange, the Attachment area (or the Drop Assets Here area, if there is no attachment yet) is highlighted in orange, and a Move icon indicates if dropping is possible.
For each file an asset card shows the file name, file size, and the upload status.
The status can be one of the following:
- Waiting: A loading indicator for files that have not been uploaded. A Cancel button is shown beside the loading indicator.
- In Progress: A progress bar during the upload. A Cancel button is shown beside the progress bar.
- “Completed” for successfully uploaded files.
- “Failed” for failed uploads.
If a file with the same name was already uploaded, an “Overwrite file” prompt opens. Click Yes to overwrite the original file attachment, click No to keep the original attachment.
3. (Option) To cancel the upload, click the Cancel button beside the Loading indicator or progress bar of the file attachment.
The upload is canceled and the attachment’s assets card removed from the process dialog box.
4. Check the Attachments count to ensure that the number of attachments complies with the allowed limits. If the Attachment count is shown in red, it exceeds the limits. In this case, delete files from the process dialog box.
5. (Option) To delete file attachments, do one of the following:
To delete a single attachment, click the Delete button on the attachment asset card.
To delete several attachments at the same time, select the attachments in the Attachments area, and click the Delete Attachment button.
All deletable attachments are deleted. The process dialog box is updated and the attachments are no longer displayed.