Publishing MediaCentral Assets with the Distribution Pane
You can use the Distribution pane to publish media packages to some of the platforms supported by Media Distribute. For Media Distribute v2.7, the following platforms are supported:
• Twitter
• Facebook
• Flickr
• YouTube
• Vimeo
• Amazon S3
You cannot attach closed captioning to your video in the Distribution pane. If you want to include closed captioning, or if you need to publish to different platforms — for example, Brightcove or Kaltura — you can use the Social Message pane.
Some social media platforms such as Twitter have restrictions on video formats, file size, and duration for supported videos. For example, Twitter restricts uploaded videos to a duration of 30 seconds. See the support Web pages of your social media platform for more information.
You can also schedule your publication date and time, and you can configure an e-mail account to receive notifications when Media Distribute completes the publishing operation.
To publish media packages with the Distribution pane:
1. Click the Layout selector and select Media Distribute.
The Media Distribute layout opens.
2. Do the following to load an asset in the Media pane.
a. Double-click an Interplay Production server or Interplay MAM database in the Launch pane.
The folder hierarchy of the MediaCentral database displays in the Assets pane.
b. Navigate to a in the Asset pane, and then double-click the asset or drag it to the Media viewer.
The asset opens in the Media pane.
c. If you do not want to add the entire video to your package, set In and Out points in the Media pane and create a subclip and then load the subclip in the Media viewer.
3. Click the Panes Menu button and select Distribution.
The Distribution pane opens.
4. (Optional) Click Load iNEWS Story.
The General text box displays the iNEWS story, including all segments. If you selected the option to transform iNEWS stories to lowercase in the System Settings, all text changes to lowercase characters.
5. (Optional) In the General text box, type the text you want to include with your package. The text in the General text box automatically displays in the Message or Description text box for each target. It also appears in the Body text box for e-mail notifications.
6. Click Load from Player.
The video displays in the Video area of the Distribution pane. The Attach Video button changes to the Remove Video button.
7. To add an image to your package, do one of the following:

Move the position indicator in the Media viewer to the appropriate frame in your video clip, and then click Load from Player.
Click Load from local drive, navigate to the image stored on your system that you want to use, and click Open.
The image displays in the Image area of the Distribution pane.

If you add video or an image to a package that you want to publish to Twitter, and you do not selected a transcoder profile, your Twitter message is restricted to 116 characters. If you add video or an image to a package for Twitter and you do set a transcoder profile, your Twitter message is restricted to 100 characters.
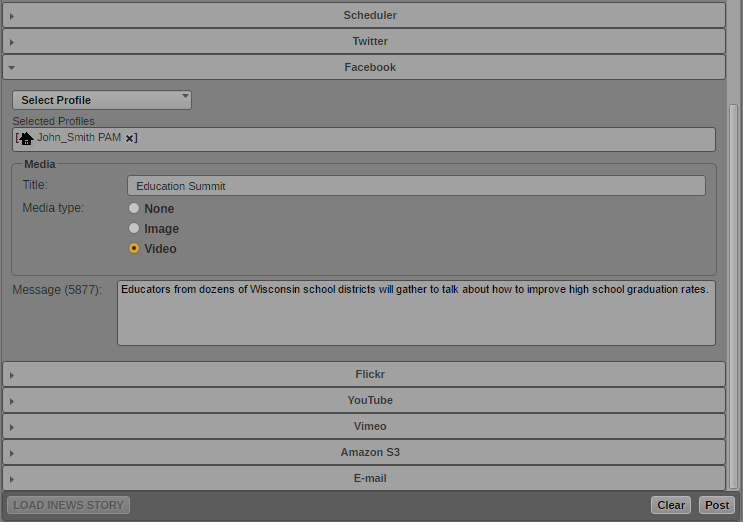
8. Click the opener for a social media target — for example, Facebook. You can select multiple targets.
Settings display in the Distribution tab for each target you select.
9. Click the Profiles menu, and select a profile. You can select multiple profiles for each target.
Profiles display in the Selected Profiles area.
| System profile |
| System profile with video transcoding |
| User profile |
If you want to delete a profile, click the “x” next to the profile name.
10. For each target, select the kind of asset you want to publish. Some targets only support certain kinds of assets.
11. (Optional) For each target, edit the Title, Message, or Description for your package.
12. If you want to schedule publication of your package for a specific date and time, click the opener for the Scheduler section. Specify a date and time, and select the option for Scheduled delivery.
13. If you want to receive an e-mail notification when your media package is published, click the opener for the E-mail section and do the following:
a. Click the Profiles menu and select an e-mail profile. You can select multiple profiles to include more recipients in the e-mail notification.
Profiles display in the Selected Profiles area. If you want to delete a profile, click the “x” next to the profile name.
b. Type a subject line in the Subject text box.
c. (Optional) Edit the text in the Body text box.
14. Click Post.
The story is sent for approval and the Distribution pane clears all fields. For information on approving stories for publishing, see
Review and Approval.