Performing a Replace Edit
A replace edit is a quick way to completely overwrite a selected segment in a sequence without changing the duration of the segment. It is similar to an overwrite edit, but a replace edit is limited to an entire segment.
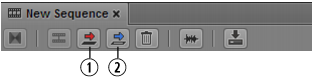
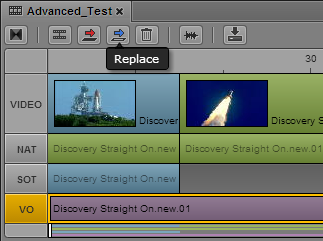
1 Overwrite button; 2 Replace button
To perform a replace edit, use the In point to indicate the start of the video you want to use in the sequence (the source material). MediaCentral UX calculates the amount of material needed to replace the selected segment. The Out point is not used in the calculation.
If there is not enough material from the In point to the end of the asset to replace the selected segment, the Replace button is disabled. The following message is displayed as a tooltip: “Insufficient source material to make this edit.”
Note the following:
• If the sequence contains L-cuts (where an audio segment starts before the video segment or extends beyond it), there must be enough audio before and after the In point to replace the audio segment. For example, if video and NAT are selected for a segment, and the NAT starts 10 frames before the video, there must be 10 frames of source audio available before the In point. If the NAT extends 10 frames beyond the video, there must be sufficient source audio after the In point.
• If a group clip is loaded (advanced sequences only), the active angle of the group clip is used as the source material.
• A replace edit preserves any dissolves in the sequence. MediaCentral UX includes the necessary media handles when determining if the edit is possible. If not enough material is available, a replace edit shortens a dissolve at the beginning or end of a segment, while keeping the dissolve symmetrical.
• A replace edit does not preserve any audio volume or panning that were applied to the selected segment before the replace edit. You need to make these adjustments again.
• In both basic and advanced sequences, markers and restrictions from the source material replace markers and restrictions in the selected segment.
The replace edit feature works differently for basic sequences and advanced sequences, as described in the following procedures.
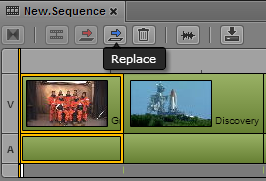
To replace video and audio in a basic sequence:
1. Load a clip in Asset mode and mark an IN point.
2. In the sequence, select the segment that you want to replace.
You cannot select only video or only audio.
3. Click the Replace button.
Video and audio in the selected segment is replaced.
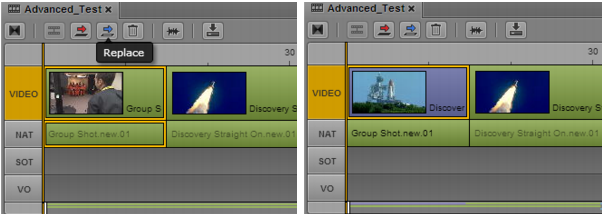
To replace only video in an advanced sequence:
1. Load a clip in Asset mode and mark an IN point.
2. In the sequence, select the segment that you want to replace.
To replace video only, make sure the NAT and SOT track buttons are not selected.
3. Click the Replace button.
The selected video is replaced. In the following illustration, the replaced video segment is colored dark blue to indicate there is no corresponding audio in the sequence. The NAT video remains green.
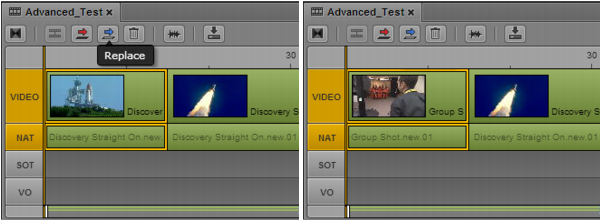
To replace video and audio in an advanced sequence:
1. Load a clip in Asset mode and mark an IN point.
2. In the sequence, select the segment that you want to replace.
3. Select the NAT or SOT track, or both.
4. Click the Replace button.
The selected video and audio is replaced. In the following illustration, the NAT track is selected, and after the edit the Video and NAT tracks are green, to indicate video plus NAT.
In the following illustration, both the NAT track and the SOT track are selected. After the edit the video segment and SOT audio segment are colored light blue, to indicate video plus SOT. Light blue is also used for video plus NAT and SOT.
To replace voice-over audio in an advanced sequence:
1. Load a clip in Asset mode and mark an IN point.
2. In the sequence, select the voice-over audio segment you want to replace.
3. Click the VO button.
4. Click the Replace button.
The selected audio is replaced.