Adding, Saving, and Deleting Restrictions
If your Interplay Production account includes the proper permissions (see
Understanding Restrictions in MediaCentral | UX), you can add, modify, save, and delete restrictions in MediaCentral UX.
To add a restriction to a master clip or subclip:
1. Load a master clip or subclip in the Media pane.
If you add a restriction to a subclip, the restriction is also added to the source master clip.
2. Set In and Out points to mark the region to which you want to add a restriction.
3. Click the Create Restriction button.
A beginning and end point are set for the restriction in the Logging pane and the restriction is automatically saved. The cursor is positioned in the Notes area so you can immediately add text for the restriction, if the Notes column is immediately to the right of the OUT column.
4. (Optional) Type text for the restriction in the Notes column, then press Ctrl+Enter.
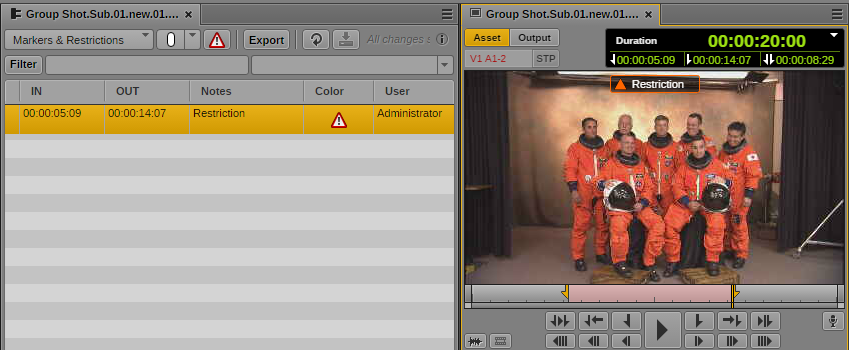
The following illustration shows a restriction that was created by setting In and Out points, and is labeled “Restriction.”
To enter edit mode and edit restriction text:

Double-click the Notes field.
 Edit mode
 refers to the state in which the cursor appears in the Notes field and you can enter text.
You cannot edit the start and end of a restriction. To change the start or end point, delete the restriction and create it again.
To save restriction text, do one of the following:
Click the Save button. Text is saved and you exit edit mode.
Press Ctrl+S. Text is saved and you remain in edit mode.
Press Ctrl+Enter to exit edit mode.
Use the mouse to select a different restriction or a marker.
Add a new restriction or marker.
To delete a restriction, select the restriction and do one of the following:
Press the Delete key (Windows), Backspace (Macintosh), or fn+Backspace (MacBook).
Right-click and select Delete.