Understanding Restrictions in MediaCentral | UX
In MediaCentral UX, you can add, modify, save, and delete restrictions in the Logging pane, similarly to the way you work with markers. The following illustration shows a restriction labeled “Footage restriction” that includes two markers.
Note the following:
• The restriction is displayed at the timecode where it starts. The far left column is colored dark orange. The IN and OUT columns show the span of the restriction. If the position indicator is within a restriction, the restriction is displayed in bold.
• A warning icon is displayed in the Color column.
• If there are markers within the restricted span, the far left column is colored orange, and the bottom of the last marker row in the span is marked by a thin yellow line.
In the previous illustration, there are two markers in the span of the restriction.
Restrictions are also marked in light red in the timeline in the Media pane, as shown in the following illustration.
You can create a restriction within another restriction, or add a restriction that overlaps another restriction. In this case, the enclosed restriction or the overlapping area is indicated by a darker shade of red in the Media Timeline.
Text for the restriction is shown on top of the Media viewer, preceded by a red triangle that indicates a restriction.
• If there are overlapping restrictions, text for the first restriction is displayed until the start of the second restriction
• If one restriction encloses another, text for the enclosing restriction is displayed.
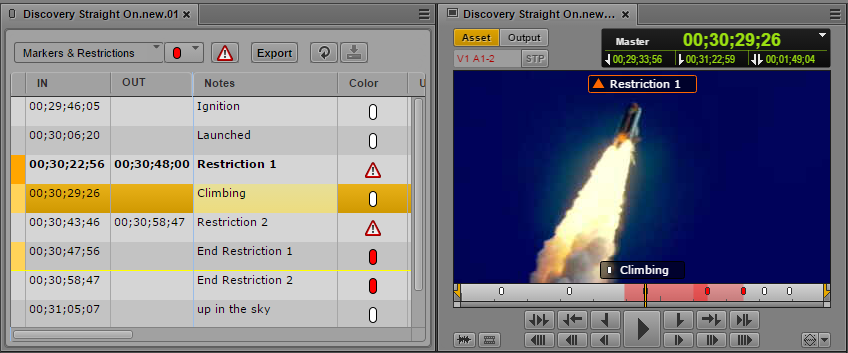
The following illustration shows the Logging pane and the Media pane for a clip named “Discovery Straight On.new.01.” This clip includes markers and two restrictions, labeled “Restriction 1” and “Restriction 2.” These restrictions overlap briefly; the overlap area is indicated in the Media Timeline by a darker shade of red. The position indicator is parked on a marker that is enclosed by the first restriction. The restriction text is shown at the top of the viewer, and the marker text is shown at the bottom.
The following illustration shows the same master clip listed in the Assets pane. An orange triangle in the State column indicates that the clip contains a restriction.

The restriction icon in the State column is displayed only for master clips that include a restriction, not subclips or sequences.
This icon is also displayed in the DRM column, if the column is selected for display.
Requirements
To create and modify restrictions, a MediaCentral UX user’s Interplay Production account must be configured with the following permissions:
• Can create restrictions
• Can modify restrictions
If a user does not have these permissions, the Create Restriction button is grayed out and a tool tip states that the user does not have permission to create a restriction.
To delete restrictions, the user’s Interplay Production account must be configured with the following permission:
• Can modify restrictions
An Interplay Production administrator sets these permissions in the Instinct/Assist User Settings view of the Interplay Administrator. For more information, see the Interplay | Engine and Interplay | Archive Engine Administration Guide or the Interplay | Production Help.
Adding and Editing Text
Adding text in the Notes column is optional. You can add restriction text immediately, or you can add a restriction without text and then add text later.
When you add a restriction without text, the restriction is saved automatically. When you add a restriction with text, the restriction is saved automatically and the text is saved if you save the restriction manually or if you step out of a restriction (exit edit mode) by using Ctrl+Enter.
Master Clips and Subclips
You can add restrictions to master clips or subclips. Master clips and subclips are linked, so that restrictions added or changed in a master clip are added or changed in the corresponding subclip. Similarly, any restrictions added or changed in a subclip are added or changed in the master clip.
Group Clips
You can view and edit restrictions for a master clip that is included in a group clip. A column labeled Angle displays the name of the master clip for each marker or restriction, as shown in the following illustration. There are two restrictions, on two different master clips.
You can add a new restriction to a master clip by selecting it as the active angle, either in single-angle view or multi-angle view. Master clips and group clips are linked, so that restrictions added or changed in a master clip are added or changed in the group clip.
You cannot add a restriction to a group clip itself.
Restrictions are shown in the Media viewer for the master clip that is selected as the active angle, in both Asset mode and Output mode.
You work with markers in the same way you work with restrictions. For more information, see
Markers and Restrictions for Group Clips.
Sequences
If you edit a master clip or subclip with a restriction into a sequence, the restriction is carried over to the sequence. Information in the source clip remains linked to the clip in the sequence, so that if there is any change to a restriction in the source clip, the information is changed in the sequence.
If the Media pane is in Output mode, any restrictions in the sequence are shown in the Logging pane, along with any markers included in the sequence. The restriction remains displayed if you trim away part of the restricted area and remains until there is no part of the restriction remaining in the sequence.
You cannot edit restrictions on sequence level. You cannot add a restriction directly to a sequence. The Create Restriction button is inactive.
If you open an unsupported sequence, such as one edited in Media Composer, a message is displayed at the top of the viewer that states “This sequence contains restricted clips.” Markers are shown in the Logging pane, but restrictions are not.