Understanding MediaCentral Delivery
MediaCentral UX has two options for delivering assets and media:
• Deliver to a remote workgroup. If your organization is configured to include multiple Interplay Production workgroups, you can use MediaCentral UX to transfer assets and media from your current workgroup to another workgroup. You use the Deliver To command. For information about configuring multiple workgroups, see the Interplay Production documentation.
• Deliver from a remote workgroup to a local workgroup. If your MediaCentral server is part of a multi-zone environment, you can search Interplay Production databases across all zones, view remote assets, and deliver them to your local Interplay Production workgroup. You use the Deliver to Me command. For information about multi-zone configuration, see the Avid MediaCentral Platform Services Installation and Configuration Guide.
Note the following:
• If you attempt to transfer a sequence before you save it, MediaCentral UX asks if you want to save the file. If you click yes, MediaCentral UX saves the file and then begins the transfer.
• If the Delivery Service is not available, a message “No profiles available” is displayed instead of the list of profiles. If the Delivery Service cannot be found, the menu options “Deliver To” and “Deliver to Me” are grayed out.
• You cannot play a clip or sequence in the Receiver workgroup until the delivery process is complete.
• Delivery of in-process clips (edit-while-capture or EWC) is not supported.
Interplay Delivery Service and Delivery Receiver Service
MediaCentral UX uses the Interplay Delivery service to perform workgroup-to-workgroup transfers of master clips, subclips, cuts-only sequences, and their media files. The Interplay Delivery Receiver service must be running on a server in the workgroup to which you are delivering the assets and media. These services are installed and configured as Interplay Production Services in an Interplay Production workgroup.

For complete information on Interplay Delivery, see “Working with the Delivery Service” in the
Interplay | Production Services Setup and User’s Guide or the Interplay | Production Help.
Deliver From Mark In to Mark Out
You can deliver a part of a clip by marking In and Out points and selecting the Deliver from Mark In to Mark Out option. If you use this feature, MediaCentral UX uses two additional services: Interplay Production Services Automation and Interplay Consolidate. For more information about these services, see the Avid Media | Index Configuration Guide.
Sequences and subclips are not supported for delivery from Mark In to Mark Out.
You cannot use MediaCentral Delivery to deliver Apple ProRes media if you select “Deliver from Mark In to Mark Out.” The Consolidate service does not support ProRes as a source or target resolution.
Delivery Profiles and Consolidate Profiles
When you use MediaCentral UX to transfer media, you select a Delivery profile that includes the target workgroup, target video quality, and other information. An Interplay Production administrator creates these Delivery profiles in the Production Services and Transfer Status Tool. These profiles are created and stored in the local Interplay Production workgroup.
In some situations, a Consolidate profile is used to determine the target resolution. An Interplay Production administrator must create at least one Consolidate profile in the Production Services and Transfer Status Tool. This profile must be named “default_for_delivery.” The resolution specified in this profile is displayed in the Deliver To and Deliver To Me dialog boxes.
If this default profile is not created, the parameter “Consolidate Target Video Quality” is blank. If you attempt a delivery using Deliver from Mark In to Mark Out, the job fails with an error message.
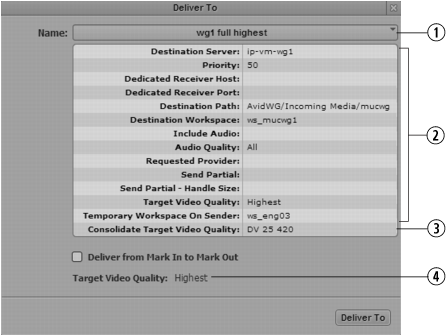
The following illustration shows the Deliver To dialog box, with parameters taken from the Delivery profile and the Consolidate profile.
1 | Delivery profile list | 3 | Parameter from default Consolidate profile |
2 | Parameters from selected Delivery profile | 4 | Resolution for media that will be delivered |
The following illustration shows two Deliver To dialog boxes:
• The dialog box on the left is using the Delivery profile “wg1 full highest” for its information. The highest resolution associated with the selected clip will be delivered.
• The dialog box on the right is using the same Delivery profile but has the option “Deliver from Mark In to Mark Out” selected. The target resolution (DV25 420) is taken from the default Consolidate profile. Consolidate creates new media. A DV25 420 clip will be delivered.
For more information on creating profiles for Interplay Consolidate, see the
Avid Media | Index Configuration Guide.
Deliver from Mark In to Mark Out Workflows
If you select “Deliver from Mark In to Mark Out,” the Consolidate service creates new clips and new assets, using information in the Consolidate profile. The following table describes several different workflows.
Delivery Profile | Media Status | Consolidate Output |
The Delivery profile includes a specific Target Video Quality. | Media exists in the specified resolution. | Consolidate creates a new asset and new media of the specified length. |
Media does not exist in the specified resolution. | Consolidate creates a new asset and new media of the specified length, in the specified resolution. If a Consolidate profile with the specified resolution does not exist, it is automatically created, using the parameters of the default profile. |
The Delivery profile does not include a specific Target Video Quality (for example, it uses “all” or “highest”). | Media exists in the resolution specified in the Consolidate profile. | Consolidate creates a new asset and new media of the specified length. |
Media does not exist in the resolution specified in the Consolidate profile. | Consolidate creates a new asset and new media of the specified length, in the specified resolution. |
Note the following:
• The new asset created by the Consolidate service is appended with “new,n.” For example, for a clip named “myclip” the resulting target clip will be named “myclip,new,1”. Subsequent assets created from other parts of the clip will be named “myclip,new,2”, “myclip,new,3”, and so on.
• Clips that are created by Mark In to Mark Out do not display headframes after they are delivered.
Related Topics