Marking In and Out Points
If you want to use only a portion of a clip, you can set an In and Out point in the clip, and then add the edited clip to the sequence that accompanies your story. By default, In and Out points are set at the first frame and last frame of a clip. You can mark In and Out points only in Asset mode.
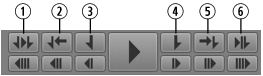
The following illustration shows the buttons in the Media pane that you use with In and Out points
1 | Play In to Out | 4 | Mark Out |
2 | Go to In | 5 | Go to Out |
3 | Mark In | 6 | Review Out |
To mark an In point:
1. Load a clip in the Media pane and navigate to the frame where you want to set the In point.
2. Do one of the following:

Click the Mark In button.
Press I or E on the keyboard.
The In point is moved to the frame you marked. If the clip is playing, marking an In point does not stop playback.
You can change an In point’s location by dragging it along the Media Timeline.
To mark an Out point:
1. Load a clip in the Media pane and navigate to the location where you want to set the Out point.
2. Do one of the following:
Click the Mark Out button.
Press O or R on the keyboard.
The Out point is moved to the location you marked. If the clip is playing, marking an Out point does not stop playback.
You can change the Out point’s location by dragging it along the Media Timeline.
To navigate to an In point, do one of the following:
Click the Go to In button.
With focus in the Media pane, press Alt+I, Alt+E, or Q.
With focus outside of the Media pane, press Ctrl+Alt+I or Ctrl+Alt+E.
To navigate to an Out point, do one of the following:
Click the Go to Out button.
With focus in the Media pane, press Alt+O, Alt+R or W.
With focus outside of the Media pane, press Ctrl+Alt+O or Ctrl+Alt+R.
To play from an In point to an Out point:
Click the Play In to Out button.
To play to an Out point from any previous frame:
Click the Review Out button.
The position indicator moves to three seconds before the Out point and plays to the Out point.