Adding Details and Resources to Assignments
You can add notes, including contacts and common information, to the assignment that can aid users involved with the story.
Clicking an option in the Outputs area opens the appropriate pane in MediaCentral UX:
• Social opens the Social Message pane if you have configured Media Distribute for your system.
• Web opens the Web Story pane if you have configured Media Distribute for your system.
• Online Video opens the Social Media Messages pane if you have configured the Social Media Hub for your system.
You can select one or more rundowns from a list of options specified in the Endpoint list in the System Settings. When you create a new assignment for an iNEWS story, MediaCentral UX creates a floated story in the iNEWS locations selected in the Rundown menu. You can work on the assigned story as soon as the assignment is created.
You can select one or more categories and topics from the corresponding lists in the System Settings to help define and organize tasks, For example, if the categories World News, Global Weather, and Politics have been created in System Settings, then when you create an assignment and click the Category menu, World News, Global Weather, and Politics appear in the Category list so you can choose the appropriate categories for your assignment.
You can also provide keywords and tags used to categorize and complement the research process for an assignment.
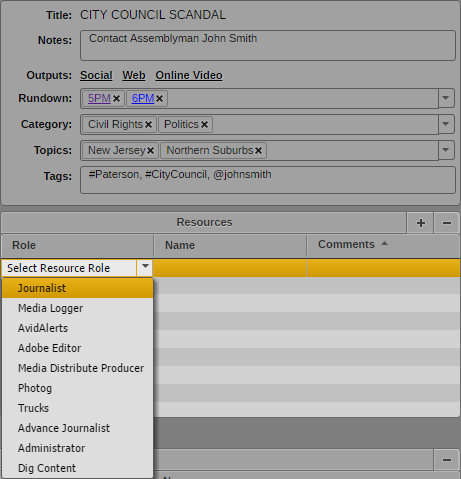
When you add resources to your assignment, you select a role for the type of resource you want to add and a name from a list of available users for that role. The types of resources available are determined by the MediaCentral UX roles set up by your administrator and can include physical and human resources, making it easy to ensure that the tasks need to cover an assignment are assigned and organized. Assignees are based on their roles — for example, photographers, camera operators, or any other role defined in MediaCentral UX. You can also add a additional comments to provide more information for the assigned resource or task.
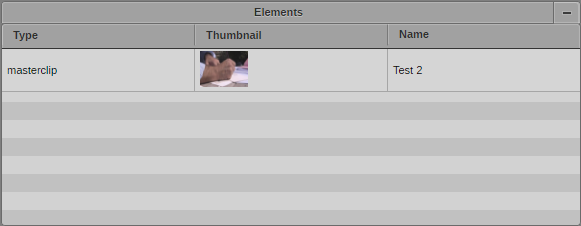
The Elements area provides a list of supporting elements to your assignment. These elements can be added from any MediaCentral database listed in the Launch pane, such as iNEWS stories or Interplay Production media clips. Multiple users — including research assistants, editors, graphic artists, journalists — can add assets to the Elements area so that a wider collaboration can contribute information and assets to the assignment.
You can drag the following elements to the Elements area:
• Assets from the MediaCentral asset pane, including Interplay Production and Interplay MAM assets
• Assets from the Media pane
• Assets from the Maestro pane
• Images from the Thumbnails pane
• iNEWS stories from Search pane
• iNEWS stories from the Queue/Story pane
• Social media assets from Social Media Hub panes
Details, resources, and elements can be added, deleted, or modified by any user associated with the assignment.
To add details to an assignment:
1. Click the assignment in the Assignments list.
2. 
Click the Details button.
The Details area opens. The title of the assignment displays at the top of the Details area.
3. If you want to add notes or comments, type in the Notes text box.
4. If you want to start creating a media package for publication using either Media Distribute or the Social Media Hub, do one of the following:

Click Social to open the Social Messages pane to create a package for a social media platform such as Twitter or Facebook. You must have Media Distribute configured in your MediaCentral environment in order to use the Social Messages pane.
Click Web to open the Web Story pane to create a package for a Web story or a standalone video package. The Web Story pane is used to send media packages to a content management system, which then can publish the package to a corporate Web page or other site. You must have Media Distribute configured in your MediaCentral environment in order to use the Web Story pane.
Click Online Video to open the SocialMedia Messages pane to create a media package for a social media platform. You must have the Social Media Hub configured in your MediaCentral environment in order to use the SocialMedia Messages pane.
For more information about using Media Distribute, see the Avid Media | Distribute User’s Guide. For more information on using the Social Media Hub, see the Social Media Hub User Guide.
5. Click the Rundown menu and select one or more rundowns for your assignment. The Rundown menu lists the available rundown queues specified by your administrator in the System Settings.

If you want to delete a rundown queue, click the “x” next to the rundown name.
6. Click the Category menu and select one or more categories for your assignment. The Category menu lists the available categories specified by your administrator in the System Settings.
If you want to delete a category, click the “x” next to the category name.
7. Click the Topics menu and select one or more topics for your assignment. The Topics menu lists the available topics specified by your administrator in the System Settings.
If you want to delete a topic, click the “x” next to the topic name.
8. Type keywords or tags for social media use in the Tags text box. Tags must be comma-separated text values.
9. Click another assignment in the Assignments list or click outside the Details area to save your changes.
To add resources to an assignment:
1. Click the assignment in the Assignments list.
2. 
Click the Details button.
The Details area opens, with the Resources area below the Title area.
3. 
Click the Add Resource (+) button.
A blank resource appears at the top of the Resources list.
4. Click the Role column for the new resource, and then select a role.
Roles are created by your MediaCentral UX administrator. For more information about creating and configuring roles, see “Creating, Deleting, and Assigning Roles” in the Avid MediaCentral | UX Administration Guide.
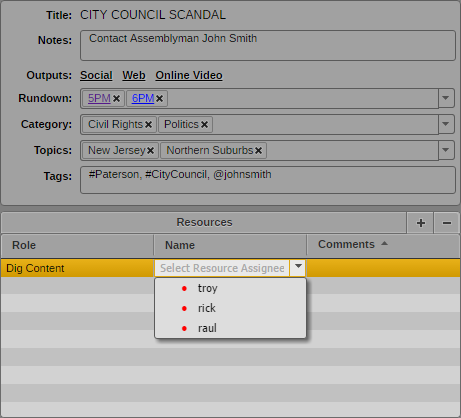
5. Click the Name column for the new resource, and then select a user.
The Name menu lists MediaCentral UX users assigned to the selected role.
6. If you want to add a comment, type in the Comments text box for your resource.
7. Click another assignment in the Assignments list or click outside the Details area to save your changes.
To delete a resource, do the following:

Select the resource, in the Resources list, and then click the Remove Resource button.
To add supporting elements to an assignment:
1. Click the assignment in the Assignments list.
2. 
Click the Elements button.
The Elements area opens.
3. Click an asset from an Assets tab or from the Media pane and drag it to the Elements area.
The asset displays in the Elements list. The Type, Thumbnail, and Name columns display the appropriate data.
4. Click another assignment in the Assignments list or click outside the Elements area to save your changes.
To delete an element, do the following:

Select the element in the Resources list, and then click the Remove Element button.